You now have a Windows form and a Database class that you created yourself.
Go back to the form and add four textboxes. Change the Name property of each
textbox to the following:
 What we're going to do now is to connect to the database using our class. We'll
do this from the Form Load event. We'll place the first record from the table
into the textboxes. Once this is done, we can then add buttons that will allow
is to scroll forwards and backwards through all the records in the table.
What we're going to do now is to connect to the database using our class. We'll
do this from the Form Load event. We'll place the first record from the table
into the textboxes. Once this is done, we can then add buttons that will allow
is to scroll forwards and backwards through all the records in the table.
To add the Form Load code stub, simply double click anywhere on your form that is not a textbox or a label. The code stub that opens up will look like this:
 Because we're going to be adding buttons later, we need to set up variables
where all the buttons can see them. The first one we need is a variable to store
our connection object. Add the following line just outside of the Form Load
event:
Because we're going to be adding buttons later, we need to set up variables
where all the buttons can see them. The first one we need is a variable to store
our connection object. Add the following line just outside of the Form Load
event:
We also need a string to hold our connection string from the Setting page we set up earlier. So add this, as well:
Your coding window should now look like this:
 We also need a DataSet object. This is because the GetConnection
method in our class is set up to load all the database data into a DataSet.
When we call our GetConnection method we'll need somewhere to put the DataSet,
which will be another DataSet. So add this line to your code, just below the
other two:
We also need a DataSet object. This is because the GetConnection
method in our class is set up to load all the database data into a DataSet.
When we call our GetConnection method we'll need somewhere to put the DataSet,
which will be another DataSet. So add this line to your code, just below the
other two:
But your coding window should now look like this:
 We can now turn our attention to the Form Load event. We'll place the code
for this event in a try … catch statement. So add the following to your
form load event:
We can now turn our attention to the Form Load event. We'll place the code
for this event in a try … catch statement. So add the following to your
form load event:
The first thing to do in the try part is to set up an object from our class.
Here's the line that does that:
We can now grab that connection we set up in the Settings page earlier. To do that, start with your conString variable then an equal sign:
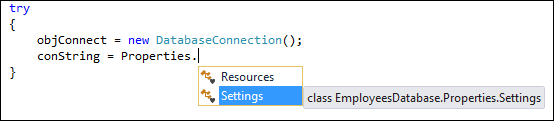 Select Settings (which refers to the Settings page), then type another
dot. You'll see the IntelliSense list again:
Select Settings (which refers to the Settings page), then type another
dot. You'll see the IntelliSense list again:
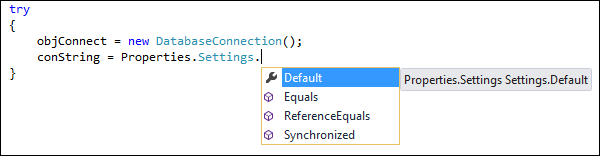 Select Default, and type another dot:
 You should see your connection string on the list, which was EmployeesConnectionString
for us. Select this and then end the line with a semicolon.
You should see your connection string on the list, which was EmployeesConnectionString
for us. Select this and then end the line with a semicolon.
Now that we've placed the connection string into our conString variable, we can hand it over to our class. Type objConnect (the name of our class object in the Form), then a dot. You should see this:
 Our connection_string property is showing up on the IntelliSense list. This
allows us to pass over the connection string to our DatabaseConnection class.
Our connection_string property is showing up on the IntelliSense list. This
allows us to pass over the connection string to our DatabaseConnection class.
Finish the line by adding the conString variable:
Add the following line to your code:
What we've done so far is to hand our DatabaseConnection class a connection string, which contains the name and location of the database; and we've also handed it some SQL, so that we can pull records from a table in the database. We set up a method in our DatabaseConnection class that takes these two values (connection string and SQL), and uses them to place data from the database into a DataSet. Let's now add code to return that DataSet.
The name of our DataSet in the Form code is ds. This is the variable we set up at the top of the Form Load event. We can call our GetConnection method from the DatabaseConnection class and hand its DataSet over to the variable ds. Add this code:
 The GetConnection method is on the list. Double click to add it to your
code, and then type a semicolon to end the line.
The GetConnection method is on the list. Double click to add it to your
code, and then type a semicolon to end the line.
We can count how many records are in the DataSet. (These are the same records that are in the database table, remember.) You do it like this:
To fill the textboxes, we can add a method. Let's call it NavigateRecords:
Because we want to access one row at a time, we can use the DataRow object we set up earlier. If you wanted to access row 1 from the DataSet, the code would be this:
To advance the row counter, we can use our inc variable:
So add the following code, just below the Form Load event:
 You can try out your code, now. Run our programme and you should find that
the first record from the database table appears in your textboxes:
You can try out your code, now. Run our programme and you should find that
the first record from the database table appears in your textboxes:
 In the next lesson, you'll add some buttons to the form so that you can scroll
forwards and backwards through all the records in the databas table.
In the next lesson, you'll add some buttons to the form so that you can scroll
forwards and backwards through all the records in the databas table.
txtFirstName
txtSurname
txtJobTitle
txtDepartment
Add four labels to your form and place them next to the textboxes. Add the
following text to the labels:txtSurname
txtJobTitle
txtDepartment
First Name
Surname
Job Title
Department
Your form will then look something like this:Surname
Job Title
Department
To add the Form Load code stub, simply double click anywhere on your form that is not a textbox or a label. The code stub that opens up will look like this:
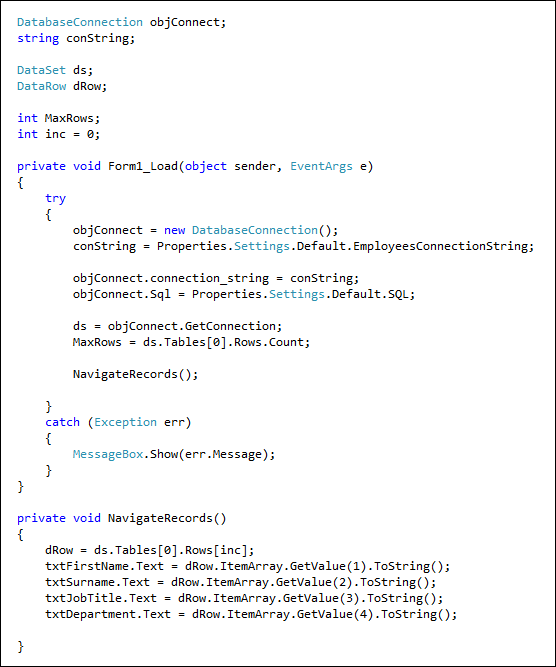
DatabaseConnection objConnect;
The variable is called objConnect. It is of type DatabaseConnection,
which is the name of our class.We also need a string to hold our connection string from the Setting page we set up earlier. So add this, as well:
string conString;
This is just a normal string variable that we've called conString. Your coding window should now look like this:
DataSet ds;
A DataSet contains rows, which correspond to a row in the database table. To
manipulate each row, you work with a DataRow object. You'll see how this
works shortly. But add this line to your code, as well:
DataRow dRow;
The final two variables we need to add outside of the form load event are these
two:
int MaxRows;
int inc = 0;
The two variables are both integers. The first one, MaxRows, will tell us how
many rows there are in the DataSet, which is how many rows were pulled from
the database table. The other integer variable, inc, will be used to move from
one record to another, and back again. We'll need this for the buttons we'll
add later.int inc = 0;
But your coding window should now look like this:
try
{
{
}
catch (Exception err)
{
catch (Exception err)
{
MessageBox.Show(err.Message);
}
Your code window should look like this:
objConnect = new DatabaseConnection( );
This creates a new object for us, of type DatabaseConnection. (Don't
forget the round brackets on the end.)We can now grab that connection we set up in the Settings page earlier. To do that, start with your conString variable then an equal sign:
conString =
After the equal sign, type the word Properties, then a dot. As soon
as you type the dot, you'll see the IntelliSense list appear:Now that we've placed the connection string into our conString variable, we can hand it over to our class. Type objConnect (the name of our class object in the Form), then a dot. You should see this:
Finish the line by adding the conString variable:
objConnect.connection_string = conString;
The next thing we need to do is to pass over some SQL to our DatabaseConnection
class. We set this up on the Settings page. The SQL was this:
SELECT * FROM tbl_employees
This reads "Select all the records from the table called tbl_employees".Add the following line to your code:
objConnect.Sql = Properties.Settings.Default.SQL;
You should see the IntelliSense list appear as you're typing the above line.
At the end, is the name of the setting we added - SQL. This all gets
passed to our DatabaseConnection class via the Sql property before the equal
sign.What we've done so far is to hand our DatabaseConnection class a connection string, which contains the name and location of the database; and we've also handed it some SQL, so that we can pull records from a table in the database. We set up a method in our DatabaseConnection class that takes these two values (connection string and SQL), and uses them to place data from the database into a DataSet. Let's now add code to return that DataSet.
The name of our DataSet in the Form code is ds. This is the variable we set up at the top of the Form Load event. We can call our GetConnection method from the DatabaseConnection class and hand its DataSet over to the variable ds. Add this code:
ds = objConnect.GetConnection;
So objConnect is our object created from the DatabaseConnection class.
Type a dot and you'll see the IntelliSense list appear:We can count how many records are in the DataSet. (These are the same records that are in the database table, remember.) You do it like this:
MaxRows = ds.Tables[0].Rows.Count;
MaxRows is the integer variable we set up at the top of the Form Load event.
After an equal sign, we have this:
ds.Tables[0].Rows.Count;
The name of our DataSet is ds. The DataSet has a property called Tables.
This is a list of all the tables in your DataSet. (We only have one table.)
The first table is at position 0. The 0 goes between square brackets. After
a dot, you type Rows.Count. This counts how many rows are in the DataSet.To fill the textboxes, we can add a method. Let's call it NavigateRecords:
private void NavigateRecords()
{
{
}
We don't need to return a value so the method is set up as void.Because we want to access one row at a time, we can use the DataRow object we set up earlier. If you wanted to access row 1 from the DataSet, the code would be this:
dRow = ds.Tables[0].Rows[1];
Here, the entire first row will be placed in the dRow variable. To place
this first row into the textboxes we can use the ItemArray property of
DataRow objects. The ItemArray property has a method called GetValue.
In between the round brackets of GetValue you type the column you want to access.
For example, take this code:
txtFirstName.Text = dRow.ItemArray.GetValue(1).ToString();
The value in between the round brackets of GetValue is 1. This will
place row 1, column 1 into the textbox called txtFirstName. If we then
advanced the row counter to 2, row 2 column 1 will be placed into the textbox.
Advanced the row counter again and row 3 column 1 will end up in the textbox.
(The ToString at the end just ensures that any non-text values get converted
to strings.)To advance the row counter, we can use our inc variable:
dRow = ds.Tables[0].Rows[inc];
So instead of hard-coding a value of 1 between Rows, we're using whatever value
is inside of the inc variable. We can then increment the inc variable
later from buttons on the form. So add the following code, just below the Form Load event:
private void NavigateRecords()
{
{
dRow = ds.Tables[0].Rows[inc];
txtFirstName.Text = dRow.ItemArray.GetValue(1).ToString();
txtSurname.Text = dRow.ItemArray.GetValue(2).ToString();
txtJobTitle.Text = dRow.ItemArray.GetValue(3).ToString();
txtDepartment.Text = dRow.ItemArray.GetValue(4).ToString();
txtSurname.Text = dRow.ItemArray.GetValue(2).ToString();
txtJobTitle.Text = dRow.ItemArray.GetValue(3).ToString();
txtDepartment.Text = dRow.ItemArray.GetValue(4).ToString();
}
Now add a call to NavigateRecords from your Form Load event:
MaxRows = ds.Tables[0].Rows.Count;
NavigateRecords( );
The whole of your code should now look like this:
0 comments:
Post a Comment